Posts

Elements and principles of design

Image
  Description:   In this project, we were tasked with capturing images representing each element and principle of design. Once we had our photos, we worked to create a PowerPoint that defined these elements and principles, providing a way for students to further explore and understand them. Extension Activity: An activity would be to go outside on a nice day with the class and do a walk around the school. Students could then point out and describe different things that they saw that we examples of elements and principles of design.

3-D Design project

Image
Description: In this project, we made a 3-D art just using paper! The first step was  drawing two organic-shaped bases on our smaller pieces of paper and cutting them out. After that, we drew 5 more organic shapes on the big piece of paper.  Then we had to cut out all of the shapes and outline each one which took a long time. After that, we got to design each of the pieces with different patterns using at least two different colors. The last thing that we did is cut slits into the shapes and then connect them to create the 3-D art. Extension Activity: An extension could be to learn about a different kind of 3-d design. Students could make pop-up-cards for valentines day to take home to their parents. 

Safari Project

Image
Description: First we created red light glasses using paper cutouts and red see-through plastic. Then we learned about upside-down drawing and we copied a picture of an animal that way. We drew the animal in light blue colored pencils.  I liked drawing in the upside-down way because it helped me focus on coping the lines better instead of the whole animal. We then covered the drawing in multiple layers of patterns made up of different warm colors like red, orange, and yellow so that the original drawing was hidden. When you wear the glasses that we created and the beginning of the lesson, the animal is magically revealed because the cool colors stand out! Las we made a note card with three hints about the hidden animal on it. Extension Activity: The teacher could create 4 or 5 of these hidden images and put them on the walls of the classroom with the hints under them. You can do this when students are learning about the difference between birds, mammals, and fish. The students would

Clay project

Image
Description: In this lesson, we had an introduction to clay and made clay tiles! We learned and used the "slab" method and also the "additive" and "subtractive" me thods. when we got our clay we  started by kneading and rolling. Then we cut the clay into the shape of a tile. with the extra clay, we made a symbol. I chose to make the peace symbol on my tile. We had to score and slip both parts of clay and put them together by adding water. Once the clay was dry I painted it.  Extension Activity : An extension would be to take the clay skills that they learned to create something else. You could do a project where they have to create a figure out of clay and then write a story about the character that they created.   

Rainbow fish- watercolor project

Image
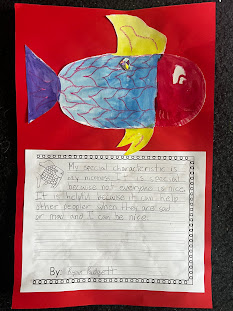
Description: For this lesson, we learned about different watercolor techniques and read  "The Rainbow Fish" is a children's book written by Marcus Pfister. T he Rainbow Fish is about a fish that finds happiness and fulfillment in sharing, and it becomes beloved among the other fish for its generosity rather than its external beauty. The class was taught a multitude of different watercolor techniques and then had the chance to practice them. We used a diagram to cut out the fish. Next students chose a few of their favorite techniques and painted the fish. At the end of the activity, we wrote 3 sentences about what our special gift is. Extension activity: You could play a game that emphasizes the idea of sharing and kindness. The game could just be a twist on "pin the tail on the donkey", instead, "put the scale on the fish." Each student gets a turn to be blindfolded and put a scale on the fish and then after they need to share something kind about ano

Printmaking flower project

Image
Description:  For this lesson, we used square pieces of Styrofoam to do printmaking. To make the design of a flower we used pencils to draw flowers onto the Styrofoam. Each student made their own flower design and chose their own paint color. I was teaching this lesson and one thing that some students struggled with was using too much paint so it would get into the crevices of the flower design when you rolled it on. Once the flower was ready students could press them onto their paper. Next Students moved from station to station pressing all of the other designs onto their paper. The vase was made by taking a piece of construction paper and folding it in half to create a shape and then cutting it out. The last steps were to glue the vase under the flowers, decorate it, and draw stems connecting the flowers. Extension Activity: Something that could go along with this lesson is a lesson about diversity. This art project is a collection of different parts made by all of the classmates t

Dot Project

Image
Description:  W e first read "The Dot" which is a famous children's book, and then made our own dots using coffee filters. On the coffee filters I used crayons, watercolor crayons, pastels,  and markers to make any kind of design. I chose to use cool colors and used the symbol of the water tribe from Avatar the Last Airbender as inspiration for the pattern. Once I added water, all of the colors blended together except for the crayon which stayed in place. That left me with a very beautiful looking dot. Extension Activity:   Have a group activity where students connect their dots to create a collaborative piece of art. Each student contributes their coffee filter dot and connects to form a larger mural to put in the hallway. This is good since the book encourages creativity and self-expression because now all the students can see everyone's uniqueness.